Monday, 24 October 2011

Free Comodo Internet Security Pro 2012 one year license key


Comodo Internet Security Pro 2012 which is priced at $49.99. This promo will allow users to use the latest pro version completely free for a year.

Free Comodo Internet Security Pro 2012

Comodo Internet Security Pro comes with powerful cloud based Antivirus, Antispyware, and an excellent award winning firewall with defense plus technology that provides high-level of protection. The 2012 consumer products from Comodo is yet to be officially released, but users can start using the new version as the new installers has been already uploaded on the official Comodo servers.


Free Comodo Internet Security Pro 2012 Free

Key Features of Comodo Internet Security Pro 2012:

  • Antivirus, Anti-Spyware, Anti-Rootkit & Bot protection
  • Defends your PC from Internet attacks
  • Detects and eliminates viruses
  • Prevents malware from being installed
  • Auto Sandbox Technology™
  • Easy to install, configure and use
  • Remote Security & System Support
Thanks to Downloadcrew they are currently running a 1 year promo of Comodo Internet Security 2011. The special installer offered by the promo has a built in serial number that can be used in the new 2012 version. Which will require below steps.

Follow below steps to get Free Comodo Internet Security Pro 2012 one year license key

  1. Download Comodo Internet Security Pro 2011 Here -> one-year special installer
  2. Install and start Comodo 2011. Navigate to “More” -> “About” -> Serial Number -> “Copy”.
  3. Save the serial number on your PC, you will need this serial to activate the 2012 version.
  4. Download and Install Free Comodo Internet Security Pro 2012. During installation, enter the serial number that you received from the 2011 version.
Note: The installer will connect to the internet and automatically activate your subscription for 1 year (365 days).

Official GNOME Shell Extensions

Official GNOME Shell Extensions Available In The WebUpd8 GNOME 3 PPA For Ubuntu 11.10

The latest official GNOME Shell Extensions (version 3.2.0) are now available in the WebUpd8 GNOME 3 PPA for Ubuntu 11.10 Oneiric Ocelot. This PPA is an attempt to have all the stable GNOME 3.2 packages that aren't available in the official Ubuntu 11.10 repositories in a single place. Please note that I did not package this. I'm only uploading these packages to a single PPA.

GNOME Shell Extensions is an official GNOME package that provides additional functionality for GNOME Shell, like a classic menu, restore the power-off entry in the user menu, the user theme extension which allows you to easily switch between GNOME Shell themes and more.


Install GNOME Shell Extensions pack in Ubuntu 11.10 Oneiric Ocelot


Important: an user has reported that using the Alternative Status Menu extension without having a profile picture crashes GNOME Shell. So set a picture (under User Accounts) before installing this extension.


Firstly, add the WebUpd8 GNOME 3 PPA:

sudo add-apt-repository ppa:webupd8team/gnome3
sudo apt-get update


Below you'll find a description on what each extension does and how to install it:


-
Alternative tab extension: use the classic ALT + Tab. Install:

sudo apt-get install gnome-shell-extensions-alternate-tab

- Alternative Status Menu extension
: adds "Power off" and "Hibernate" to the status menu, visible at all time (and not just when pressing the ALT key). Install:
 es/THEME_NAME/gnome-shell or /usr/share/THEME_NAME/gnome-shell. This extension is especially useful when used with GNOME Tweak Tool. This way, you can install and switch between GNOME Shell extensions with a click. Install both User Theme extension and GNOME Tweak Tool:
 
sudo apt-get install gnome-shell-extensions-user-theme gnome-tweak-tool

- Workspace Indicator extension:
displays the current workspace and lets you switch between workspaces (wither using its menu or by scrolling). Install:

sudo apt-get install gnome-shell-extensions-workspace-indicator

- Applications Menu extension:
adds an regular (old-style) menu to the top GNOME Shell bar. Install:

sudo apt-get install gnome-shell-extensions-apps-menu

- Removable Drive Menu extension:
adds a removable drive menu to the top GNOME Shell bar (on the right). Install:

sudo apt-get install gnome-shell-extensions-drive-menu

- SystemMonitor extension:
adds two graphs to the GNOME Shell message tray, displaying the RAM and CPU usage. Install:

sudo apt-get install gnome-shell-extensions-system-monitor

- Places Status Indicator:
adds a menu to the top bar in the old Places Menu style. Install:

sudo apt-get install gnome-shell-extensions-places-menu

- Dock extension: shows a dock-style task switcher

To customize the dock extension, install dconf-tools (sudo apt-get install dconf-tools), then launch "dconf-editor", navigate to org > gnome > shell > extensions > dock and here you can specify the dock position (left or right), enable or disable autohide, specify the hide effect or set the hide duration.

Install:

sudo apt-get install gnome-shell-extensions-dock


- Native Window Placement extension: uses a 'natural' (reflects more the position and size of the actual window) algorithm for displaying the thumbnails in the activities overview. Install:
 
sudo apt-get install gnome-shell-extensions-native-window-placement


- Xrandr Indicator (Monitor Status Indicator) extension: adds a systems status menu for rotating monitors (overrides what is currently provided by gnome-settings-daemon). Install:
 
sudo apt-get install gnome-shell-extensions-xrandr-indicator


- Auto Move Windows extension: this extension can be used to get some applications to always start on a specific workspace Install: 
 
sudo apt-get install gnome-shell-extensions-auto-move-windows


- Gajim extension:
Gajim integration for GNOME Shell. Install:

sudo apt-get install gnome-shell-extensions-gajim


- Windows Navigator extension: Allow keyboard selection of windows and workspaces in overlay mode: when you hold the ALT key, a number is assigned to each window (displayed in the top left corner) and you can then press the number to switch to that window. Install:
 
sudo apt-get install gnome-shell-extensions-windows-navigator

Or, install them all using the following command
(will also install GNOME Tweak Tool) - yeah, there's no meta package yet:

sudo apt-get install gnome-shell-extensions-alternate-tab 
gnome-shell-extensions-alternative-status-menu 
gnome-shell-extensions-user-theme 
gnome-tweak-tool 
gnome-shell-extensions-workspace-indicator 
gnome-shell-extensions-apps-menu 
gnome-shell-extensions-drive-menu 
gnome-shell-extensions-system-monitor 
gnome-shell-extensions-places-menu 
gnome-shell-extensions-dock 
gnome-shell-extensions-native-window-placement 
gnome-shell-extensions-gajim 
gnome-shell-extensions-xrandr-indicator 
gnome-shell-extensions-windows-navigator 
gnome-shell-extensions-auto-move-windows


Once installed, reload GNOME Shell (press ALT + F2 and enter "r" or log out and log back in), then use GNOME Tweak Tool to easily enable/disable extensions or switch between GNOME Shell themes on the fly - there's no need to restart GNOME Shell anymore.

Bypassing Windows 7 Kernel ASLR

Windows 7 has a nice security about kernel space

Many checks of size, integrity controls and access restrictions are available.For example the “security check” protect our stack if a string is used, many functions like “strcpy()” are deprecated (and some are disallowed) to force developers to have a secure coding.This is why, some attacks were presented as heap overflows in local exploitations (recently Tarjei Mandt)but we don’t see any remote exploitation like we saw in SRV.SYS or other drivers.This lack of remote exploits occurs partially because an ASLR (randomization of memory spaces) is enabled in kernel land. If a hacker doesn’t have any possibilities to jump and execute a payload (ROP, Jmp Eax …) exploitation of the bug isn’t possible. Only a magnificent BSOD could appear in most of the cases.This paper will try to explain how to bypass this protection and improve remote kernel vulnerabilities research!For the use of this document we will consider a remote stack overflow as the main vulnerability

Download PDF

A Code Execution Vulnerability in Google App Engine SDK for Python

Google App Engine is a great technology allowing web developers to develop their own web applications,test them in their internal framework, and deploy them to Google’s appspot.com domain.The Google App Engine framework allows developers to write their web site logic in Python, and offers several frameworks specially created for this. In addition, Google App Engine provides an SDK Console via web that acts as an administration console for the newly written application.This advisory lists 4 different vulnerabilities, one in admin console and three others in the Google python API, which allow a remote attacker to gain full code execution on the developer’s machine. These severe issues have been communicated to Google, and a fix was released last month on Sep 12, 2012 (in version 1.5.4).

Download PDF

WebBackdoors , Attack, Evasion and Detection

This paper provides insight on common web back doors and how simple manipulations could make them undetectable by AV and other security suits. Paper explains few techniques that could be used to render undetectable and unnoticed backdoor inside web applications. This paper is mainly an update for an old paper of ours Effectiveness of Antivirus in Detecting Web Application Backdoors, which mainly questioned the effectiveness of AV with respect to web shells and analysis of a couple of web shells. Current paper takes this topic further and explains a couple of methodologies that could be used to make stealth application layer backdoors using web scripting languages .This paper explains various Web Backdoor attacks and evasion techniques that could be used to stay undetected.


Download PDF

Monday, 26 September 2011

How to crack or Reset BIOS Password? ~Cracking Tutorials

The BIOS software is built into the PC, and is the first code run by a PC when powered on ('boot firmware'). The primary function of the BIOS is to set up the hardware and load and start a boot loader. When the PC starts up, the first job for the BIOS is to initialize and identify system devices such as the video display card, keyboard and mouse, hard disk drive, optical disc drive and other hardware. The BIOS then locates software held on a peripheral device (designated as a 'boot device'), such as a hard disk or a CD/DVD, and loads and executes that software, giving it control of the PC. This process is known as booting, or booting up, which is short for bootstrapping.
Bios password is usually used to protect the user's BIOS settings on the computer. If you want to reset the password on the BIOS does not need to bother to connect bateray CMOSnya, with a little trick on the Dos you can reset the BIOS password on it in 2 ways:

1. Clear CMOS
This way I consider the most ancient and most easy to break down the password on the BIOS. The steps are easy, first open the casing cover computer CPU. Then find the bios battery that looks something like the battery just a little more big clock. After the meet and consider the area around the battery there is usually a jumper with 3 pins, 2 pins and 1 pin not connected.

Suppose the three pins with the code 1 - 2 - 3. Connector that connects the initial position usually is 2-3. To reset the bios do I move the position of the plug that connects pins 2-3 to position 1-2 for about 5 seconds. Then plug it back into the starting position (2-3). Try restarting the computer back on, secured the bios password is gone.

If the above looks complicated, is easy to clear cmos by unplugging the BIOS battery and then put it back. But with the consequences of removing the label is the warranty on the battery BIOS.

2. Through DOS

First out of the windows with me restart your computer, start the computer in MS-DOS mode, use the option "Command Prompt Only"

At c: prompt, type: DEBUG
press enter. You will see the sign (-) at the DEBUG prompt, then type:
o 70 2e
at the DEBUG prompt will be displayed as-o 70 2e.
press enter and type:
-O 71 ff
press enter, the last type:
Q
hit enter, then you will get out of the DEBUG prompt and return to the C:> prompt.
Now restart your COMPUTER, and see the results

Forgotten Ubuntu Password – Reset within minutes

Forgotten Ubuntu Password – Reset within minutes

If you’ve ever forgotten your password, you aren’t alone… it’s probably one of the most common tech support problems I’ve encountered over the years. Luckily if you are using Ubuntu they made it incredibly easy to reset your password.

All it takes is adjusting the boot parameters slightly and typing a command or two, but we’ll walk you through it.

Reset Your Ubuntu Password

Reboot your computer, and then as soon as you see the GRUB Loading screen, make sure to hit the ESC key so that you can get to the menu.

Root Shell – Easy Method

If you have the option, you can choose the “recovery mode” item on the menu, usually found right below your default kernel option.

Then choose “Drop to root shell prompt” from this menu.

This should give you a root shell prompt.

Alternate Root Shell Method

If you don’t have the recovery mode option, this is the alternate way to manually edit the grub options to allow for a root shell.

First you’ll want to make sure to choose the regular boot kernel that you use (typically just the default one), and then use the “e” key to choose to edit that boot option.

Now just hit the down arrow key over to the “kernel” option, and then use the “e” key to switch to edit mode for the kernel option.

You’ll first be presented with a screen where you can find this written “ro single”

You’ll want to remove the “ro single” part with the backspace key, and then add this onto the end:

rw init=/bin/bash

Once you hit enter after adjusting the kernel line, you’ll need to use the B key to choose to boot with that option.

At this point the system should boot up very quickly to a command prompt.

Changing the Actual Password

You can use the following command to reset your password:

passwd <username>

After changing your password, use the following commands to reboot your system. (The sync command makes sure to write out data to the disk before rebooting)

sync
reboot –f

I found that the –f parameter was necessary to get the reboot command to work for some reason. You could always hardware reset instead, but make sure to use the sync command first.
And now you should be able to login without any issues.

Pin any item to the Windows 7 taskbar

Hey you know what guys, you could pin your favorite applications or files so that you could open them quickly from any window at any time.
In Windows 7, you can pin shortcuts for favorite or frequently used files, folders, and websites to the Jump Lists for each of those programs to the taskbar
To pin a program shortcut to the taskbar, do one of the following:
•    If the program is already running, right-click the program’s button on the taskbar (or drag the button toward the desktop) to open the program’s Jump List, and then click Pin this program to taskbar.
•    Or if the program isn’t running, click Start, find the program’s icon, right-click the icon, and then click Pin to Taskbar.
•    You can also pin a program by dragging the program’s shortcut from the desktop or Start menu to the taskbar.

Concept of Hibernate mode

When you switch your laptop to hibernate mode, you are turning your computer off but saving everything you had up last while the computer was on. So when you turn it back on, the laptop will load up all the last work or whatever windows you had open before you enabled hibernate. As we all know when we restart our system, all the data that was present in RAM get vanished.
So how exactly this hibernate mode loads all the last work you had open before. In hibernate mode the current state of the system is saved in file called hiberfil.sys in your C drive and size of this file is around 1.5 Gb. Bydefault this file is invisible, if you want see this file
Goto folder options >> view >> choose show option and uncheck hide O/S protected files.
But I recommend you should always hide your O/S protected files.
So when you will choose hibernate mode your system will power down. When you will turn the system power back on, the saved information is read from the hiberfil.sys, restoring the last used settings.

Wednesday, 24 August 2011

Advanced SQL Injection - Defcon 17 - john Mccray


According to OWASP top 10 vulnerabilities of 2010, SQL injection is the most dangerous and most common vulnerability around, A SQL Injection vulnerability occurs due to improper input validation or no input validation at all, what I mean by improper or no input validation is the user input is not filtered(for escape characters) before it gets passed to the SQL database, A Sql injection attack can be any many forms, but it's usually categorized into 3 types:

1. Inband
2. Out of band
3. Inferential

n this presentation john Mccray discusses some of advanced SQL Injection methods and topics such as IDS evasion, filter bypassing etc.


BackTrack 5 R1 Released - Penetration Testing Distribution


BackTrack is a Linux-based penetration testing arsenal that aids security professionals in the ability to perform assessments in a purely native environment dedicated to hacking. Regardless if you’re making BackTrack your primary operating system, booting from a LiveDVD, or using your favorite thumbdrive, BackTrack has been customized down to every package, kernel configuration, script and patch solely for the purpose of the penetration tester.

Official BackTrack 5 R1 change log:

  1. This release contains over 120 bug fixes, 30 new tools and 70 tool updates.
  2. The kernel was updated to 2.6.39.4 and includes the relevant injection patches.

According to the guys at OffSec, This release is their best one yet! Some pesky issues such as rfkill in VMWare with rtl8187 issues have been fixed, which provides for a much more solid experience with BackTrack.We’ve have Gnome and KDE ISO images for 32 and 64 bit (no arm this release), as well as a VMWare image of a 32 bit Gnome install, with VMWare Tools pre-installed.
We are mighty excited and are already downloading this release just as we speak!
Download Backtrack 5 R1

Reverse Engineering Hacking Tutorial- Introduction to assembly language

Hello friends, lets continue our tutorial on reverse engineering. Today i will teach you assembly language basic that are necessary for learning reverse engineering. As we all know assembly language is very important for reverse engineering and we must know, what are registers and which register serves for what. How the assembly language instruction work and how can we relate them with normal high language coding( C, JAVA, VB, etc.)  to hack any software. So friends, lets start our reverse engineering hacking class part 2..

reverse engineering, assembly language
Reverse Engineering Hacking Tutorial- Introduction to assembly language

What is Assembly language?
Assembly language is a low level or simply called machine language made up of machine instructions. Assembly language is specific to processor architecture example different for x86 architecture than for SPARC architecture. Assembly language consist of assembly instructions and CPU registers. iMasterhack  means I will explain my tutorial considering x86 architecture... Ahhha... From where i start explaining to you ... assembly language is too big topic... I think i have to tell only what you need for reverse engineering.. So i start from CPU registers.

CPU registers - Brief Introduction:
First of all what are registers? Most of Computer Engineering and Electronics Engineering guys knows about them but for others, Registers are small segments of memory inside CPU that are used for storing temporary data. Some registers have specific functions, others are just use for some general data storage. I am considering that you all are using x86 machines. There are two types of processors 32 bit and 64 bit processors. In a 32 bit processor, each register can hold 32 bits of data. On the other hand 64 bit register can hold 64 bit data. I am explaining this tutorial considering that we are using 32 bit processors. I will explain the same for 64 bits in later classes on iMasterhack's blog.
There are several registers but for Reverse engineering we iMasterhack's blog users are only interested in general purpose registers. We are interested in only 9 General purpose registers namely:
EAX
EBX
ECX
EDX
ESI
EDI
ESP
EBP
EIP
All these registers serves for different purposes. So I will start explaining all of them one by one for a more clear and accurate understanding of register concepts. I am putting more strain on these because these registers are called heart of reverse engineering.
EAX register is accumulator register which is used to store results of calculations. If any function returns a value its stored into EAX register. We can access EAX register using functions to retrieve the value of EAX register.
Note: EAX register can also be used for holding normal values regardless of calculations too.


The EDX is the data register. It’s basically an extension of EAX to assist it in storing extra data for complex operations. It can also be used for general purpose data storage.

The ECX, also called the count register, is used for looping operations. The repeated operations could be storing a string or counting numbers.

The ESI and EDI relied upon by loops that process data. The ESI register is the source index for data operation and holds the location of the input data stream. The EDI points to the location where the result of data operation is stored, or the destination index.

ESP is the stack pointer, and EBP is the base pointer. These registers are used for managing function calls and stack operations. When a function is called, the function’s arguments are pushed on the stack and are followed by a return address. The ESP register points to the very top of the stack, so it will point to the return address. EBP is used to point to the bottom of the call stack.

EBX is the only register that was not designed for anything specific. It can be used for extra storage.
EIP is the register that points to the current instruction being executed. As the CPU moves through the binary executing code, EIP is updated to reflect the location where the execution is occurring.
The 'E' at the beginning of each register name stands for Extended. When a register is referred to by its extended name, it indicates that all 32 bits of the register are being addressed.  An interesting thing about registers is that they can be broken down into smaller subsets of themselves; the first sixteen bits of each register can be referenced by simply removing the 'E' from the name. For example, if you wanted to only manipulate the first sixteen bits of the EAX register, you would refer to it as the AX register. Additionally, registers AX through DX can be further broken down into two eight bit parts. So, if you wanted to manipulate only the first eight bits (bits 0-7) of the AX register, you would refer to the register as AL; if you wanted to manipulate the last eight bits (bits 8-15) of the AX register, you would refer to the register as AH ('L' standing for Low and 'H' standing for High).
Introduction to Memory and Stacks:
There are three main sections of memory:

1. Stack Section - Where the stack is located, stores local variables and function arguments.

2. Data Section - Where the heap is located, stores static and dynamic variables.

3. Code Section - Where the actual program instructions are located.

The stack section starts at the high memory addresses and grows downwards, towards the lower memory addresses; conversely, the data section (heap) starts at the lower memory addresses and grows upwards, towards the high memory addresses. Therefore, the stack and the heap grow towards each other as more variables are placed in each of those sections. I have shown that in below Figure..
High Memory Addresses (0xFFFFFFFF)
---------------------- <-----Bottom of the stack

|                          |

|                          |   |

|         Stack        |   | Stack grows down

|                          |   v

|                          |

|---------------------| <----Top of the stack (ESP points here)

|                          |

|                          |

|                          |

|                          |

|                          |

|---------------------|  <----Top of the heap

|                          |

|                          |    ^

|       Heap          |     |   Heap grows up

|                          |    |

|                          |

|---------------------| <-----Bottom of the heap

|                          |

|    Instructions    |

|                          |

|                          |

-----------------------

Low Memory Addresses (0x00000000)
 
 Some Essential Assembly Instructions for Reverse Engineering:

Instruction Example          Description
push     push eax Pushes the value stored in EAX onto the stack
pop pop eax Pops a value off of the stack and stores it in EAX
call call 0x08abcdef Calls a function located at 0x08abcdef
mov mov eax,0x5 Moves the value of 5 into the EAX register
sub sub eax,0x4 Subtracts 4 from the value in the EAX register
add add eax,0x1 Adds 1 to the value in the EAX register
inc inc eax Increases the value stored in EAX by one
dec dec eax Decreases the value stored in EAX by one
cmp cmp eax,edx Compare values in EAX and EDX; if equal set the zero flag* to 1
test test eax,edx Performs an AND operation on the values in EAX and EDX; if the result is zero, sets the zero flag to 1
jmp jmp 0x08abcde Jump to the instruction located at 0x08abcde
jnz jnz 0x08ffff01 Jump if the zero flag is set to 1
jne jne 0x08ffff01 Jump to 0x08ffff01 if a comparison is not equal
and and eax,ebx Performs a bit wise AND operation on the values stored in EAX and EBX; the result is saved in EAX
or or eax,ebx Performs a bit wise OR operation on the values stored in EAX and EBX; the result is saved in EAX
xor xor eax,eax Performs a bit wise XOR operation on the values stored in EAX and EBX; the result is saved in EAX
leave leave Remove data from the stack before returning
ret ret Return to a parent function
nop nop No operation (a 'do nothing' instruction)

*The zero flag (ZF) is a 1 bit indicator which records the result of a cmp or test instruction

Each instruction performs one specific task, and can deal directly with registers, memory addresses, and the contents thereof. It is easiest to understand exactly what these functions are used for when seen in the context of a simple hello world program and try to relate assembly language with high level language such as C language.
Here is simple C program that displays Hello World:
int main(int argc, char *argv[])                    {                     printf("Hello World!\n");                 return 0;           }    

Save this program as helloworld.c and compile it with 'gcc -o helloworld helloworld.c'; run the resulting binary and it should print "Hello World!" on the screen and exit. Ahhah... It looks quite simple. Now let's look how it will look in assembly language.

0x8048384     push ebp                      <--- Save the EBP value on the stack
0x8048385     mov ebp,esp               <--- Create a new EBP value for this function
0x8048387     sub esp,0x8                 <---Allocate 8 bytes on the stack for local variables
0x804838a     and esp,0xfffffff0          <---Clear the last byte of the ESP register
0x804838d     mov eax,0x0                 <---Place a zero in the EAX register
0x8048392     sub esp,eax                  <---Subtract EAX (0) from the value in ESP
0x8048394     mov DWORD PTR [esp],0x80484c4     <---Place our argument for the printf() (at address 0x08048384) onto the stack
0x804839b     call 0x80482b0 <_init+56>                     <---Call printf()
0x80483a0     mov eax,0x0                 <---Put our return value (0) into EAX
0x80483a5     leave                              <---Clean up the local variables and restore the EBP value
0x80483a6     ret                                  <---Pop the saved EIP value back into the EIP register
As you can easily figure out these instructions are similar to that of C program. You can easily note that flow of program is same. Off course it will be same as its a assembly code of same binary (exe) obtained from executing above C program.
 
I hope you all like it. We will continue our discussion tomorrow where i will explain how to analyze assembly language codes for those binaries whose high level source code we don't have.
A quick tip for all users how to learn assembly language better...  Pick a already made code and generate its binary or exe file and now obtains the assembly code of that binary and try to relate assembly code with high language code. I guarantee that will surely help you to understand better as I always used to do understand things like these ways only.

Best Password Hacking Breaking Tools 2011 Link Updated

Hello Friends , Today I am sharing with you my latest Collection of "Best Password Hacking Tools 2011". Using this password hacking kit you will be able to crack a lot of passwords like Windows Admin password, pdf passwords, zip files passwords, document passwords, rar passwords and much more.. I am sure you will like this post.


best hacking tools, password crackers, password hacking softwares


This Password Hacking Kit Consists of following Password Hacking Breaking Tools:
1. PDF Password Remover
2. Windows XP Admin Password Remover
3. Zip File Password Cracker.
4. SQL Password Remover
5. Microsoft Office Password Remover.
6. Microsoft Windows Vista Password Remover.
7. Rar File Password Cracker
8. Windows Password Recovery Kit
9. Password Changer.
10. Distributed File Password Recovery..
and much more..

As the name of the tools suggests its a complete password hacking Kit. So guys Enjoy Latest Hacking tools ..

How to Use it??
1. Download the Password Hacking Kit From Below:

2. Extract the file and Install it.

3. Then Register them and use it. ( all tools contains Full serial keys and patches)..

Reverse Engineering Hacking Tutorial

Today i will teach you basics of Reverse Engineering and in further hacking classes we will discuss it in depth with practical reverse engineering examples.
 Today we will discuss what is reverse engineering? How its useful for ethical hacks? Common terms used in reverse engineering. In next post i will share the best reverse engineering software's and tools that i normally use to reverse engineer any program, software or windows file. So friends, lets start our hacking class of reverse engineering.


What is Reverse Engineering?
Have you ever noticed, Nokia or Iphone made an application and after few days you find that on Samsung or any other mobile device. Its nothing that difficult, its called reverse engineering. They decode their programs to get the basic structure of the original program and then following the structure codes their own and sometimes doesn't even happen just make some code changes and uses them.
According to Wikipedia "Reverse engineering is the process of discovering the technological principles of a device, object or system through analysis of its structure, function and operation. It often involves taking something (e.g., a mechanical device, electronic component, biological, chemical or organic matter or software program) apart and analyzing its workings in detail to be used in maintenance, or to try to make a new device or program that does the same thing without using or simply duplicating (without understanding) the original".

Ahh.. more technology related. I will explain you in better way. As the name suggest reverse engineer means if have something already made, in computer field say exe installer file. Now what reverse engineering is, decoding the exe in such as fashion that we will get original source code or some what near to it. Consider an example, you have a wall made of bricks, here bricks are base material to build the wall. Now what we want to do is we want to obtain all the bricks from the wall. Similarly we have an executable or dll file and we know programs are made from coding only, so source codes are base material in building executable. So we want to obtain the source code from the executable or some what near to it. As when you break wall also to get the bricks some bricks are also got broken and that's all depend type of material used to fix or mend bricks to make the wall. Similarly the retrieval of source code from executable depends upon how securely software is being packed and type of cryptography or packer is used by its designer.

I hope now you have got what exactly reverse engineering is...

What is the use or benefit of Reverse Engineering?
I can guarantee most of internet users use cracks or keygens or patches. Have you ever tried to understand how they are made. Ahhh... I know you haven't. So let me give you clear information. All the keygens or cracks or patches of software's are made by technique called Reverse Engineering. Oops... I was going to tell the benefits.. what i am telling...negative features... But these are features of reverse engineering my friends and most commonly used by all famous organizations as its a part of their Program promoting methodolgy.

Other Beneficial Uses of Reverse Engineering:
  • Product analysis: To examine how a product works
  • Removal of copy protection, circumvention of access restrictions.
  • Security auditing.
  • Extremely useful when you lost documentation.
  • Academic/learning purposes.
  • Competitive technical intelligence (understand what your competitor is actually doing, versus what they say they are doing).
  • Last but not the least..Learning: learn from others' mistakes. Do not make the same mistakes that others have already made and subsequently corrected.

Common Terms Used in Reverse Engineering:
1. Debugger
2. Deassembler
3. Decompiler
4. Packers or Unpackers
5. Program Obfuscation
6. Hex Editing
7. Cryptography

I will explain these terms in detail in my next article. Till then you can explore these topics on internet so that you will have some prior knowledge of Reverse Engineering terms.

Note: Reverse Engineering articles will going to be more advanced and technology oriented which surely requires prior knowledge of Assembly language specially registers and accumulators and several reverse engineering commands like JMP, DCL etc..

winAUTOPWN v2.7 Released - Vulnerability Testing on Windows

winAUTOPWN and bsdAUTOPWN are minimal Interactive Frameworks which act as a frontend for quick systems vulnerability exploitation. It takes inputs like IP address, Hostname, CMS Path, etc. and does a smart multi- threaded portscan for TCP ports 1 to 65535. Exploits capable of giving Remote Shells, which are released publicly over the Internet by active contributors and exploit writers are constantly added to winAUTOPWN/bsdAUTOPWN. A lot of these exploits are written in scripting languages like python, perl and php. Presence of these language interpreters is essential for successful exploitations using winAUTOPWN/bsdAUTOPWN.


Exploits written in languages like C, Delphi, ASM which can be compiled are pre-compiled and added along-with others. On successful exploitation winAUTOPWN/bsdAUTOPWN gives a remote shell and waits for the attacker to use the shell before trying other exploits. This way the attacker can count and check the number of exploits which actually worked on a Target System.


Download

WebsiteDefender – Ensure Your Website Security

WebsiteDefender is an online service that monitors your website for hacker activity, audits the security of your web site and gives you easy to understand solutions to keep your website safe. With WebsiteDefender you can:

  • Detect Malware present on your website
  • Audit your web site for security issues
  • Avoid getting blacklisted by Google
  • Keep your web site content & data safe
  • Get alerted to suspicious hacker activity
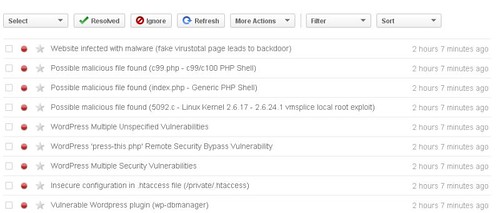
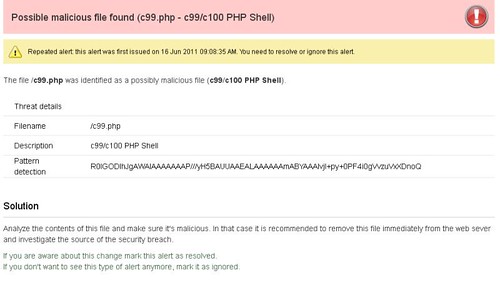
It has an easy to user interface, it picks up all kinds of issues such as malware, reverse shells like c99, obvious stuff like outdated Plugins and WordPress core, weak passwords, bad configurations (including .htaccess config) and much more.
WebsiteDefender
Each alert is well explained and will help you to solve any issues the system finds on your blog/site.
WebsiteDefender
The great value with this for me is once you are subscribed, you will be automatically alerted of new issues by email as and when they occur. This will help you keep your website secure and will let you know immediately if any issues develop.
They’ve even released two WordPress plugins which you can find here:
WP Security Scan & Secure WordPress
You can check out the website here and sign up for a free account to test it out:
http://www.websitedefender.com/
They are on Twitter too @WebsiteDefender & Facebook.

Friday, 29 July 2011

Online SQLi Scanners

Browser Based Hacking Framework - Mantra Security Toolkit 0.6.1 Released

Mantra is a collection of free and open source tools integrated into a web browser, which can become handy for students, penetration testers, web application developers,security professionals etc. It is portable, ready-to-run, compact and follows the true spirit of free and open source software.


The software is intended to be lite, flexible, portable and user friendly with a nice graphical user interface. You can carry it in memory cards, flash drives, CD/DVDs, etc. It can be run natively on Linux, Windows and Mac platforms. It can also be installed on to your system within minutes. Mantra is absolutely free of cost and takes no time for you to set up.

Mantra can be very helpful in performing all the five phases of attacks including reconnaissance, scanning and enumeration, gaining access, escalation of privileges, maintaining access, and covering tracks. Apart from that it also contains a set of tools targeted for web developers and code debuggers which makes it handy for both offensive security and defensive security related tasks.


Project Goals
  • Create an ecosystem for hackers based on browser
  • To bring the attention of security people to the potential of a browser based security platform
  • Provide easy to use and portable platform for demonstrating common web based attacks( read training )
  • To associate with other security tools/products to make a better environment.
You can download Mantra 0.6.1 here:
Linux 32-bit – Mantra Security Toolkit – Gandiva.tar.bz2
Windows – OWASP Mantra Security Toolkit – Gandiva.exe
Or read more here.

WordPress Security/Vulnerability Scanner - WPScan

WPScan is a vulnerability scanner which checks the security of WordPress installations using a black box approach (scanning without any prior knowledge of what has been installed etc).

Features

  • Username enumeration (from author querystring and location header)
  • Weak password cracking (multithreaded)
  • Version enumeration (from generator meta tag)
  • Vulnerability enumeration (based on version)
  • Plugin enumeration (2220 most popular by default)
  • Plugin vulnerability enumeration (based on version) (todo)
  • Plugin enumeration list generation
  • Other misc WordPress checks (theme name, dir listing, …)

Requirements

WPScan requires two non native Ruby gems, typhoeus and xml-simple. It should work on both Ruby 1.8.x and 1.9.x.

sudo apt-get install libcurl4-gnutls-dev
sudo gem install –user-install typhoeus
sudo gem install –user-install xml-simple

The full README is available here.

You can download WPScan by checking it out from the SVN repository on Google Code:

svn checkout http://wpscan.googlecode.com/svn/trunk/ wpscan-read-only

Or you can read more here.

PuTTY v.0.61 Released

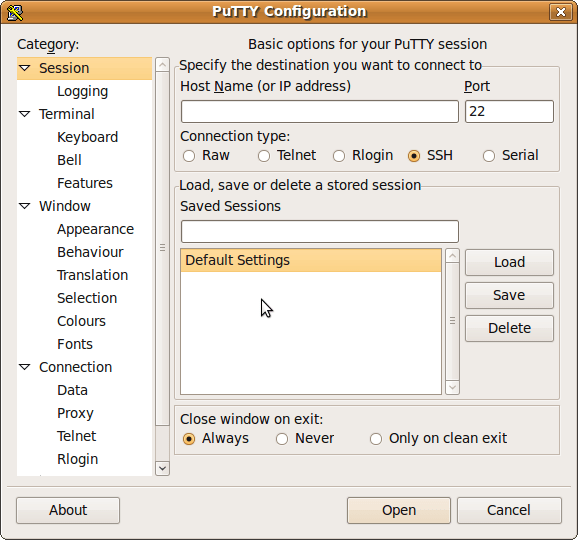
PuTTY 0.61 is out, after over four years , with new features, bug fixes, and compatibility updates for Windows 7 and various SSH server software.

                                                         
PuTTY is a free implementation of Telnet and SSH for Windows and Unix platforms, along with an xterm terminal emulator

These features are new in beta 0.61:
Kerberos/GSSAPI authentication in SSH-2.
Local X11 authorisation support on Windows. (Unix already had it, of course.)
Support for non-fixed-width fonts on Windows.
GTK 2 support on Unix.
Specifying the logical host name independently of the physical network address to connect to.
Crypto and flow control optimisations.
Support for the zlib@openssh.com SSH-2 compression method.
Support for new Windows 7 UI features: Aero resizing and jump lists.
Support for OpenSSH AES-encrypted private key files in PuTTYgen.
Bug fix: handles OpenSSH private keys with primes in either order.
Bug fix: corruption of port forwarding is fixed (we think).
Bug fix: various crashes and hangs when exiting on failure,
Bug fix: hang in the serial back end on Windows.
Bug fix: Windows clipboard is now read asynchronously, in case of deadlock due to the clipboard owner being at the far end of the same PuTTY's network connection (either via X forwarding or via tunnelled rdesktop).


Airtel Fastest Proxy Free 3G Gprs Internet Tricks


UC Web Browser 8.0 Airtel Fastest Proxy Free 3G Gprs Internet Tricks

Airtel Free 3G Gprs Internet Working in UCweb 8.0 ( UC Browser 8.0) Unofficial Alpha English Version, Download UC Browser 8.0 and Free Airtel Unlimited Surf Browsing and Download using Mobile Office Settings , Access Point APN : airtelgprs.com
Airtel Free Internet In PC Computers Using Opera 11, use following settings and get Airtel fastest proxy with unlimited Downloads
Proxy IP : 75.68.49.100
Port : 80
Home Page : http://122.170.122.214/proxy/index.php
APN : airtelgprs.com
Regards
iMasterhack

Thursday, 28 July 2011

Vodafone Free Gprs Tricks

Vodafone Free Gprs Tricks


Vodafone Free Gprs Tricks Rs 4 Plan , Vodafone user get unlimited free gprs internet Send SMS ACT GPRS To 140 you will get 30MB Free Gprs Internet Data Pack, Once Finish 30MB Data usage again send SMS ACT GPRS To 140 , Again and again activate free vodafone gprs in your mobile phone,Maintain balance below Rs 5/-.
Vodafone Free Gprs Tricks only working for Punjab.


Regards
iMasterhack

Tata Docomo Free GPRS Proxy Server For Opera Mini Handler


Tata Docomo Free GPRS Tricks Working Again, First Download Opera Mini Handler Version and Install, Open your Opera mini handler in your tata docomo mobile phone, Set Divein Settings as Default Settings For Opera Mini, Set http in Custom Field in your Opera Mini handler and Socket Server http://203.115.112.5.server4.operamini.com Or http://10.124.72.171.server4.operamini.com and then Proxy Type No Proxy ( Don’t Enter Anything in Proxy Server Field )
Now Connect Free Gprs in your Tata Docomo Mobile Phone , Must Working Your balance above Rs 1/-.
Regards
iMasterhack

Reliance GSM Free GPRS Settings For Opera Min 6

Reliance Free GPRS Settings For Opera Min 6

Reliance GSM Free GPRS Settings For Opera Min 6

Free Reliance GSM Gprs Tricks Working in Opera Mini 6, Download Opera Mini 6 and Install it in your reliance gsm mobile phones, Reliance Free Gprs Settings below
Proxy Address : 64.255.180.253
Port : 80
Access Point (APN) : rcomnet or smartwap
Make Theses settings as a default , Open Opera Mini 6 Only change Proxy Type : HTTP and Server as :wap.rworld.co.im 
Regards
iMasterhack